Activate the WordPress Module
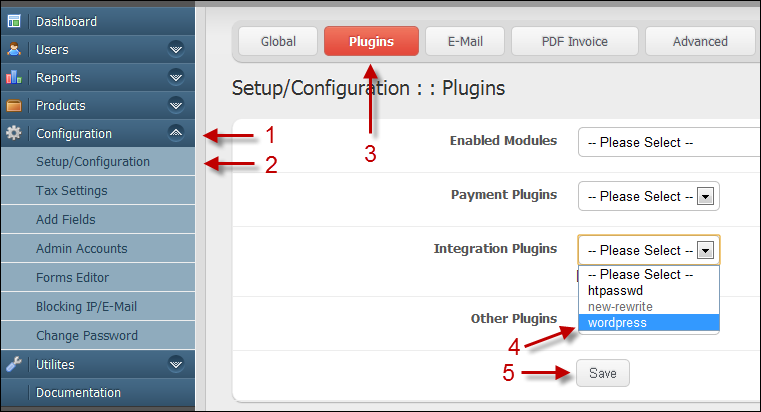
From the aMember Control Panel (CP) follow these steps:
- Click on the "Configuration" bar in the left menu panel.
- Click on the "Setup/Configuration" button in the left menu panel.
- Click on the "Plugins" button in the top menu bar.
- Click on "WordPress" from the "Integration Plugins" drop down menu.
- Click on the "Save" button.

From the Setup/Configuration Page follow these steps:
- Click on the "WordPress" button in the top menu bar.
- Provide the "Path to WordPress Folder" using one of the following techniques.

2a - Manually Enter the Path You can manually enter the path to the WordPress Folder. This is NOT something like "http://example.com/wordpress" which is the URL people use to view WordPress as a website. Also note that WordPress may have been installed in the site's root directory instead of in a folder (sub directory).
If you are logged into your server a server-side path to the WordPress folder will look something like this "/home/amemberp/public_html" In this case WordPress is installed in the root of the site (sometimes also called "www"). Also note that this path may look different than yours based on server configurations. You should find this path information in you website's control panel.
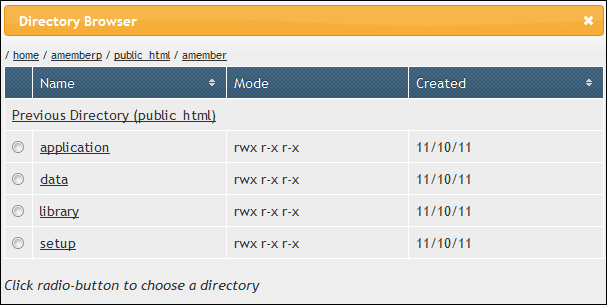
2b - Use The Directory Browser You may also establish the path to the WordPress folder using the Directory Browser. Open this utility by clicking on the "browse" link as shown in the above image. A Directory Browser similar to the one shown below will open in a pop-up window.
Note in this image the browser is showing the path to the aMember folder.

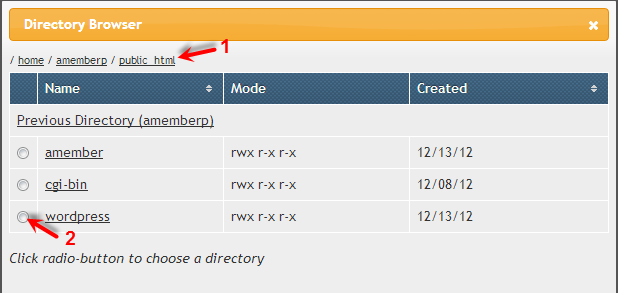
In this example, WordPress is installed in a sub-directory named "wordpress". In order to pick this folder follow these steps:
- Click on the "public_html" folder in the breadcrumb menu located at the top.
- Click on the "wordpress" radio button as shown in the image below.

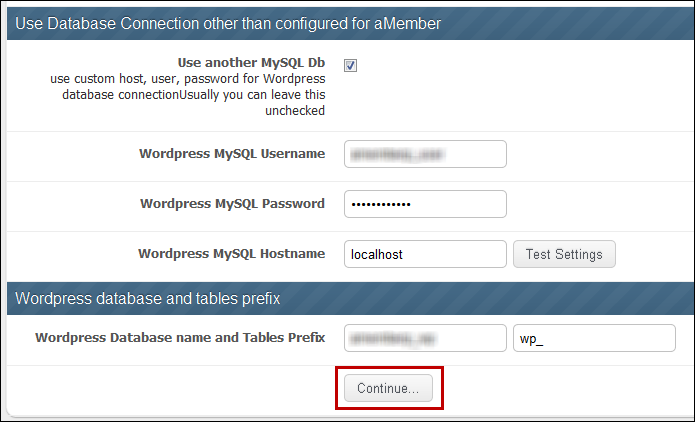
As soon as the path to the WordPress folder is entered either manually or by using the Directory Browser, aMember will fill in all the needed WordPress database information in the lower part of the page. Check this information for accuracy and then click on the "Continue" button at the bottom of the page.

At this point, the WordPress Setup/Configuration page will reload and open a new settings section at the bottom of the page. See the WordPress Settings Page for instructions on how to configure these settings.