Page : Post : Category Protection Settings
If the aMember plugin is installed in WordPress then every page, post, and category will have the aMember Protection Panel added towards the bottom of the page. By default it is minimized and looks like the image below.
- To add protection, check the "Protection enabled" box.
- Checking the "Exclude page from menus" only applies to theme-based menus. This setting has no effect on a menu built with the WordPress Custom Menu utility (which is used on most WordPress-powered sites).

To apply protection to the given page, post, or category follow these steps:
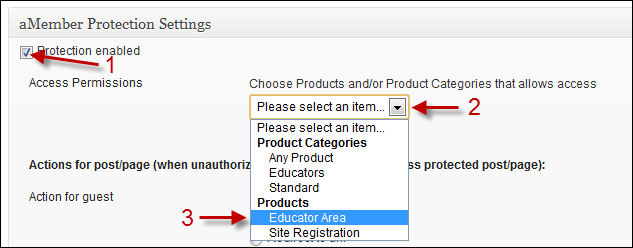
- Check the "Protection enabled" box.
- Open the drop down menu for products and product categories by clicking on the down arrow.
- Choose which product or product category subscription is required to see this page, post, or category.
In the example below the "Educator Area" product is picked. This means a user will need an active subscription to the Educator Area to access this page, post, or category. You can add more than one product or product category to any page, post, or category.

The "Educator Area" product is now listed as a required to view this page, post, or category. You may add additional products or product categories by repeating the steps above.
Note the following information and features that are displayed for each protected product or category:
- Click this "X" if you want to delete the Educator Area product as a requirement to view this content.
- Access for the Educator Area product starts as defined in the product details in aMember. Subscriptions can be configured to start at the time of purchase, or on a specific date.
- Access for the Educator Area will expire as defined in the product details in aMember.

To deliver content incrementally, see the next topic - Incremental Content Delivery.