Protecting Links to Files
While the access to WordPress pages/posts can be restricted as described earlier, any links on the page must also use a protection scheme or they can easily be bookmarked by the user and visited later without the user being logged in. This page covers the best way to protect all files except video. Video file protection is covered on this page.
The current aMember file protection feature is based on the files being uploaded to the site's server. If the files that need to be protected are large and you expect a large bandwidth requirement to serve up the files, a content distribution network (CDN) solution such as Amazon's S3 should be considered. The maximum file size that can be uploaded to a given server is found on aMember's Version Information page. Note that Amazon S3 integration is on aMember's Road Map for an upcoming major release (4.2+).
To view a server's maximum file size upload limitation follow these steps:
- Click on the "Utilities" Bar in the left menu
- Then click on the "Version Info" menu button
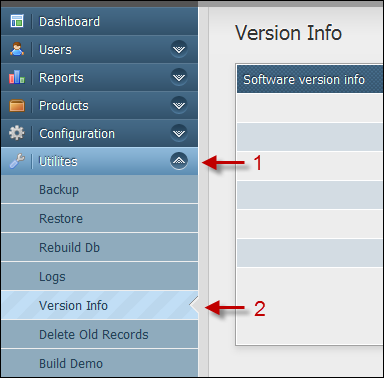
Then scroll down and look for the "upload_max_filesize" value. In the example below, the value is 10 Megabytes.

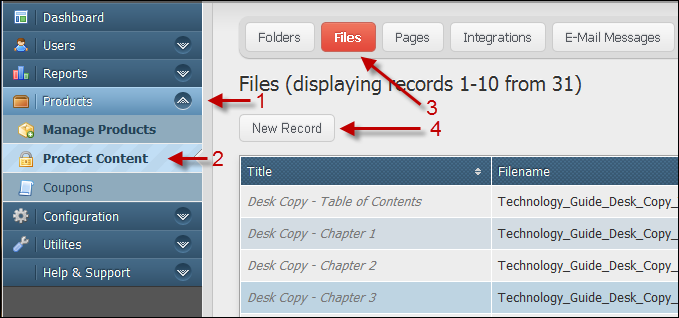
To upload a file to the site's server and add protection to it follow these steps:
- Click on the "Products" bar in the left menu
- Click on the "Product Content" menu button
- Click on the "Files" button in the top menu bar
- Click on the "New Record" button as show in the image below
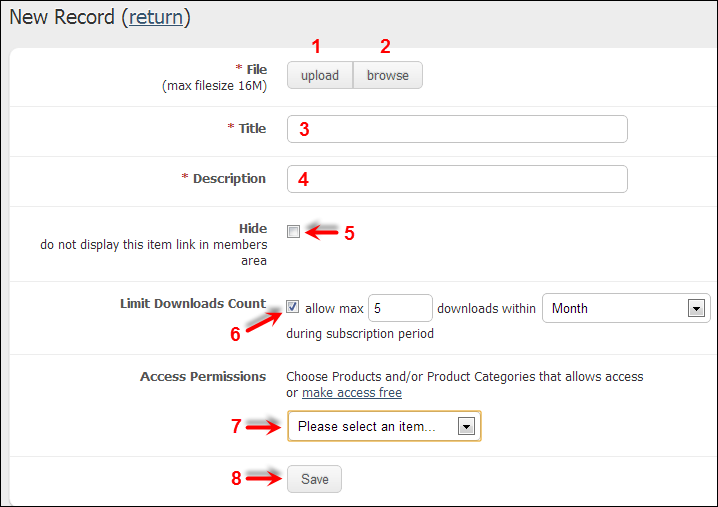
A form like the one shown below will then open up.
To add a file with protection follow these steps:
- File - Upload a file from your local computer by using the file upload feature -or-
- File - Browse to a file that already exists on the aMember server or other web storage services (such as Amazon S3) using the file browser feature. When you click on this button a file browser window will pop-up. See details on this feature after this section.
- Title - Add a title/name to the file
- Description - Enter a short description of the file here
- Hide - By default, links to protected files are listed in the Member's Area. If you do not want the link shown in the Member's area, check this box.
- Limit Downloads Count - Check this box to set a maximum number of downloads that can be performed in a set amount of time.
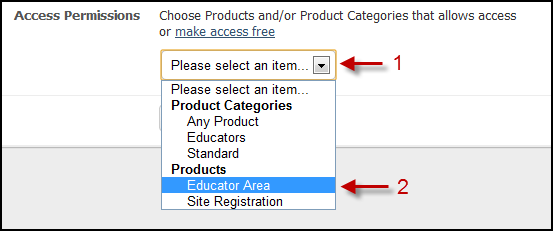
- Access Permissions - Click on "Please select an item..." drop down menu to assign a membership product, or category, to the file.
- Save - Always finish by clicking on the "Save" button
File Browser Popup
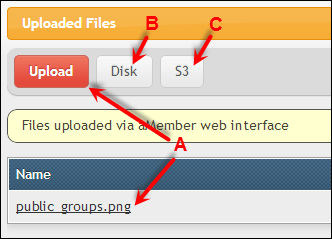
If you click on "Browse" (#2 in the above illustration) the following file browser window will pop up. You have the following three choices:
Upload (A) - Use this button to choose a file that was previously uploaded by the aMember upload button (#1 on the main file page). All files previously uploaded are listed on this page. So click on "Upload" then click on the file name from the list to choose a previously uploaded file. Disk (B) - Use this option to pick a file that was previously uploaded into the http://example.com/amember/data/upload directory via FTP or any other file transfer process. S3 (C) - If you have enabled the Amazon S3 plugin, this button will be available. This allows you to securely serve a file from a file stored in a S3 bucket.
- After clicking on the "Please select an item..." drop down menu, the menu will open up to display all previously defined membership products and categories.
- Choose from the listed products or categories. After you make a choice, you can reopen the drop down menu and make additional choices.
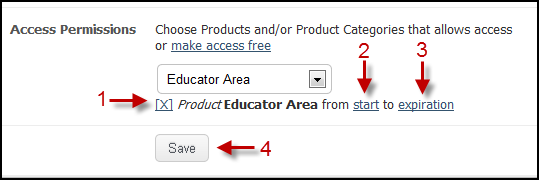
After a product or category is picked, it will be displayed as shown in the image below.
- You can delete a membership product, or category, by clicking on the "X"
- By default, access to the file will start as defined in the Product setup configuration.
- By default, access to the file will expire as defined in the Product setup configuration.
- Always click on "Save" after making any changes on this page.
Note that the "start" and "expiration" days can be configured to provide file access in an incremental fashion. For more information on setting up incremental content delivery, see this page.
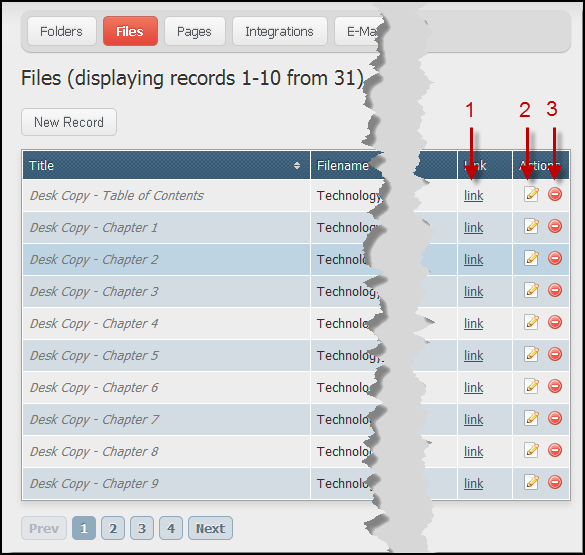
After the file configuration page is saved. The file will be shown on the File List Page as shown in the image below.
- Link - This is the link to use for the protected file. Hover over the link and click the right mouse button. From the Contextual Menu choose "Copy link address"
- Edit - Click on this icon to edit the settings for the protected file.
- Delete - Click on this icon to delete the file from the protected area.
