Creating a New Form
Introduction
aMember allows to create your own forms with the specific sections you need. You can choose a template offered by aMember or upload a template of your own and select the sections you need in your form.
Form Types
There are three types of forms that you can create using the Forms Editor.
| Form Type | Description |
|---|---|
| Signup Form | Is the form a customer uses to sign up for a subscription/account on your site. |
| Profile Form | Is the form a customer uses to update his profile information (Login, Email, Custom Profile fields etc.) |
| Affliate Signup Form | Is the form a customer/non-customer can use to signup as an affiliate. |
The basic process for creating the form is the same. The only difference is that there are fewer available sections that you can choose from for affiliate forms.
Creating a New Form
- Select the Forms Editor from the options on the left side of the page. See forms editor for more instructions on how to do this.
- On the Forms Editor page, click on the "New Signup Form" button to create a signup form or click on the "New Affiliate button" to create a new affiliate form.
- The New Form page will be displayed for the selected form type.
Adding Form Information
- The Form Type field is prefilled since you selected the New Signup Form. This cannot be changed.
- In the "Custom Signup Form Title", enter a name for the form to use a custom title. Otherwise leave the field blank and the default title for the form will be used.
- In the "Comment" field, type in any notes about the form for internal reference. The contents of this field will not be displayed to customers. It is purely for admin reference.
- In the "Secret Code" field, enter a code to control who can signup for an account. When you enter a code here, only those people who have the code will be able to sigup using the form. To allow anyone to signup without restriction, leave this field blank.
Adding Form Bricks
Form Bricks are nothing but form sections that you can choose to build your form. You can choose individual form bricks to include in your form according to your requirements and also customize the form labels.
To Add Form Bricks
The new signup forms comes with some form bricks already added the form. You can remove these bricks and add other available bricks to create your form. There are two columns of form bricks
Form Bricks - are those bricks that have already been added to the form.
Available Bricks - are those bricks that are available for your use. You can add any number of available bricks to your form to customize it according to your preferences.

To add fields into the form, click on that item in the "Available Bricks" list and drag it to "Form Bricks".
To remove fields, click on the item in the "Form Bricks" and drag it to "Available Bricks".
To make a form multi-page, select "PageSeparator" from the "Available Bricks" and drag into the place where you want page to be split.
Customizing Form Bricks
You can customize form bricks to display the items and labels that you want in the form fields. These can be customized once you add an available form brick to the selected form bricks.
Customizing Form Labels
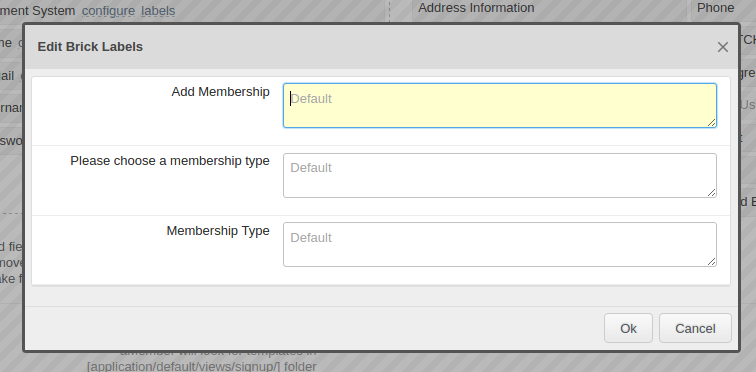
- Click on "labels" for the items whose label needs to be edited.
See screenshot below.

- The Edit Label pop-up window is displayed. In this window, you can
select the label for the field and the actual starting value in the
field.

- Type in the labels that you would like to see in the appropriate fields provided and click "OK" to save changes or "Cancel" to discard changes.
Customizing Form Display and Input Type
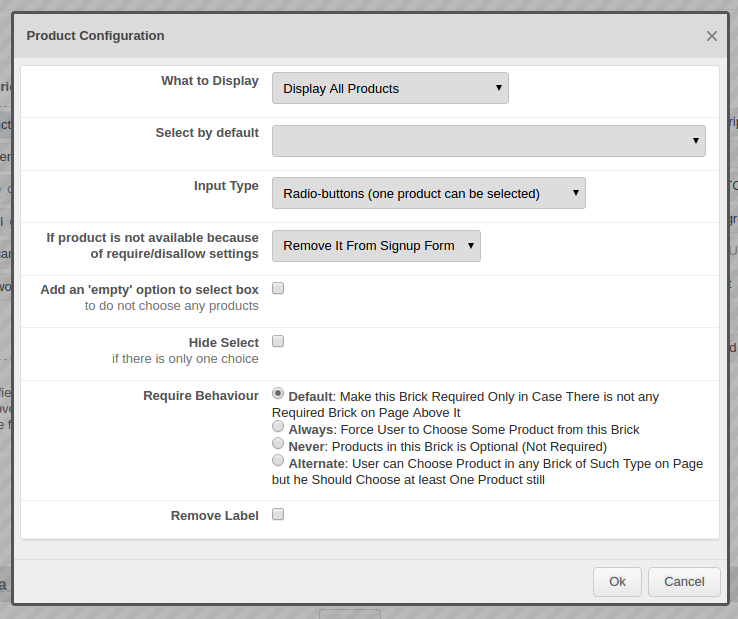
Click on "Configure" for the item that needs to be edited. See screenshot below. Note: Only some fields have the configure option.
The Product Configuration pop-up window is displayed. In this window, you can select the product to display and the selection/input type. :

In the "What to Display" field, click on the arrow button and select the categories to display from the drop-down list of available options.

In the "Input Type" field, click on the arrow button and select the input type from the drop-down list of available options.The selection type you select here will be displayed on the form. For example, if you select "Radio buttons" here. The user will have to select a radio button in this field.

Click "OK" to save changes or "Cancel" to discard changes.
Choosing a Form Template
You can select a template from available templates for your form. The default template is used for all forms, but if you would like to use another template, click on the arrow in the "Template" field and select another templates from the drop-down list of available templates.

Click on the "Save" button to save the new form. The new form will be displayed in the list of forms on the Forms Editor page
