Paypal
PayPal Website Payments Standard - Overview
PayPal Website Payments Standard (referred to as PayPal for the remainder of this page) is a popular credit card processing service. It is an all inclusive solution; therefore, it does not require a separate merchant account. Paypal offers three types of accounts; Personal, Premier, and Business. aMember requires either the Premier or Business account.
Most of the aMember pricing flexibility (trial periods and recurring plans) and coupon usability is tied to the choice of payment processor. PayPal supports a high level of pricing/coupon flexibility since all products are built "on the fly" by the aMember software.
aMember Setup / Configuration
PayPal Configuration video guide is available
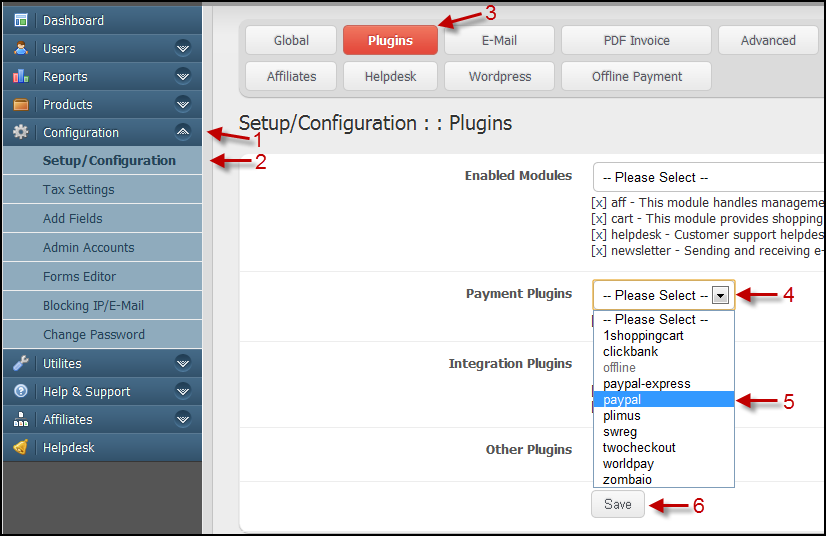
Activate the PayPal payment plugin by following these steps:
- Click on the "Configuration" bar in the left panel
- Click on the "Setup/Configuration" button in the left panel
- Click on the "Plugins" button in the top menu
- Click on the arrow in the Payment Plugin drop down menu
- Click on "PayPal"
- Click on the "Save" button
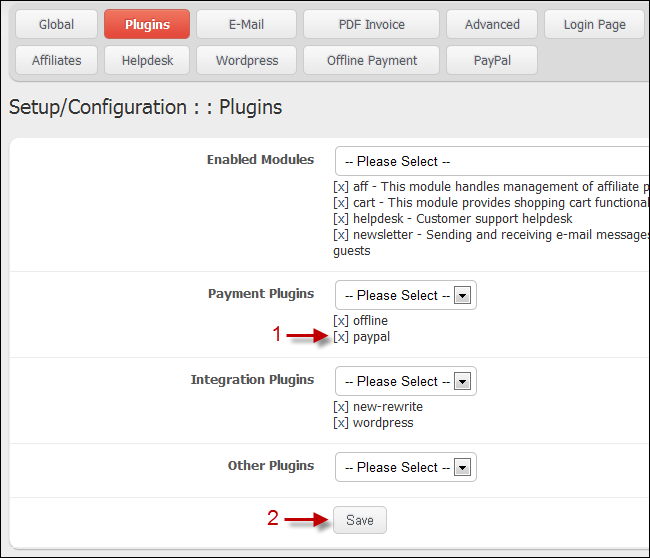
After the page is saved, the Setup/Configuration Plugins Page will reload and look like the page shown below.
- PayPal will now be listed in the "Payment Plugins" area as activated. To deactivate the PayPal plugin click on the "X"
- After making any changes on this page click on the "Save" button
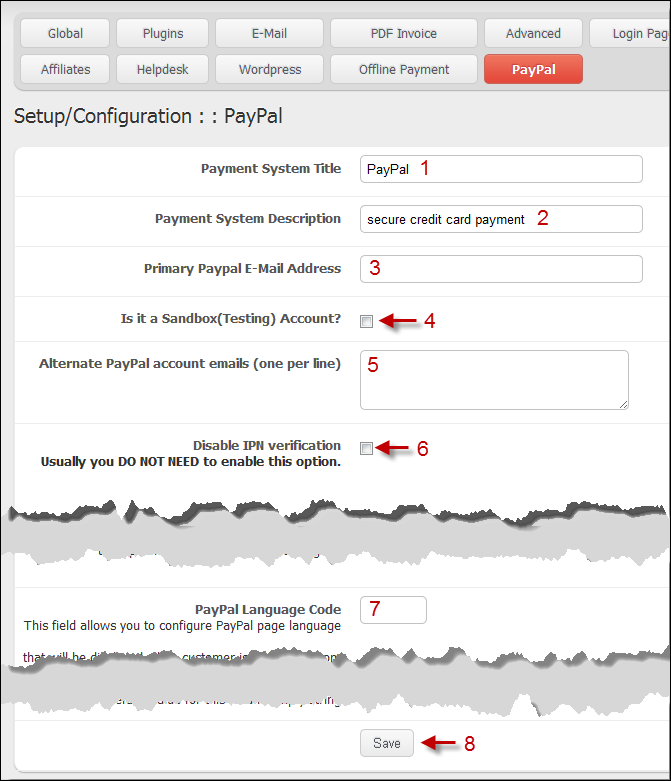
From the Setup/Configuration Plugins page, click on the "PayPal" button in the top menu and follow the following instructions.
- Payment System Title - This is the name of the payment processor that is displayed on the sales pages. This should be "PayPal".
- Payment System Description - This is the description of the payment processor that is displayed on the sales pages. You may change the default text as needed.
- Primary PayPal E-Mail Address - This must be the email that is registered with your Premier or Business PayPal account as the primary email.
- Is it a Sandbox (Testing) Account? - If the PayPal account is not live and is being used for testing, check this box.
- Alternative PayPal account emails - If you listed any alternative email addresses with your PayPal account, list them here. One email per line.
- Disable IPN Verification - You should rarely have to check this box. If you do, it should be only for a temporary period. Some web hosting PHP scripts do not allow any contact from an external web site. This limitation breaks the functionality of the PayPal payment integration plugin, since aMember Pro is unable to authenticate information with the PayPal service. In this case, AS TEMPORARY SOLUTION, you can enable this option; however, "hackers" can signup on your site without actual payment. So if you have enabled this option, contact your webhost and ask them to open outgoing connections to www.paypal.com port 80 ASAP, then disable this option to make your site secure again.
- PayPal Language Code - This field allows you to configure PayPal's page language that will be displayed when customer is redirected from your website to PayPal for payment. By default this value is empty and PayPal will automatically choose which language to use. Alternatively you can specify, for example: en (for english language) or fr (for french Language) and so on. In this case, PayPal will not choose language automatically.
- Save - After any changes are made on this page, click on the "Save" button.
At the very bottom of this page you will find your site's Instant Payment Notification URL. You will need this URL when configuring your PayPal account.

PayPal Setup / Configurations
To configure your PayPal account to work with aMember, follow these steps:
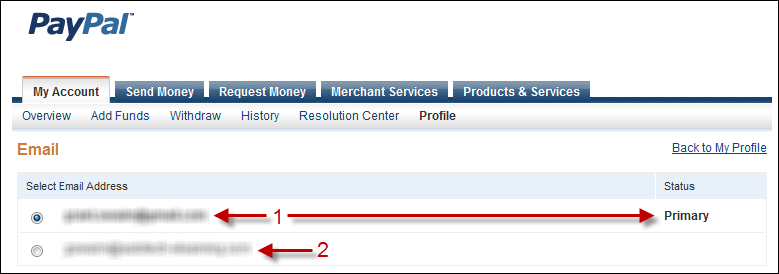
- Log into your Premier or Business PayPal account and click on the "My Account" tab.
- Hover over the "Profile" menu link.
- Click on the "Add or Edit Email" link.
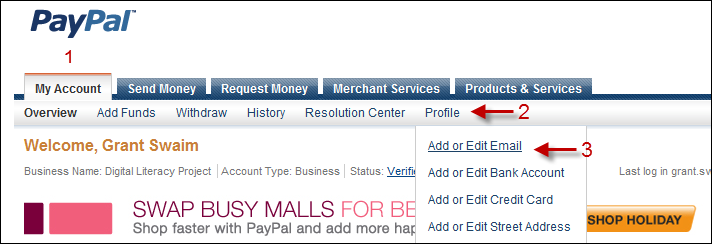
- Make sure the email listed as "Primary" matches the email entered in Step 3 on the aMember PayPal configuration page.
- List any alternative email listed in PayPal in the box referenced in Step 5 on the aMember PayPal configuration page.
Configure your Instant Payment Notification (IPN) settings by following these steps:
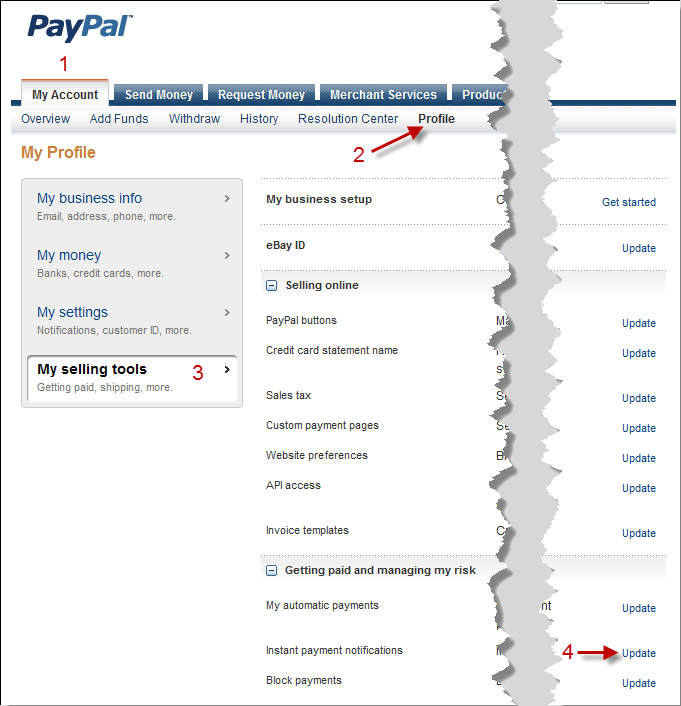
- Click on the "My Account" tab.
- Click on the "Profile" link in the top sub-menu bar.
- Click on "My Selling Tools" in the left panel.
- Click on the Instant Payment Notifications "Update" link.
- Click on "Edit settings" button.

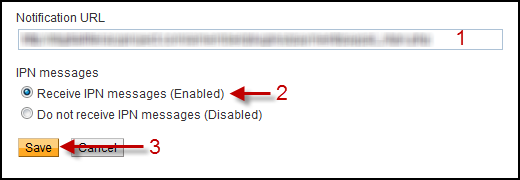
- Enter your IPN Notification URL in this box. This link is listed at the very bottom of the aMember PayPal Setup / Configuration Page.
- Make sure that IPN messages are "Enabled".
- Click on the "Save" button.
- Click Profile.
- From the Selling Preferences column, click Website Payment Preferences.
- In the Encrypted Website Payments section, select Off.
- Click on the "Save" button
The PayPal Purchase Experience
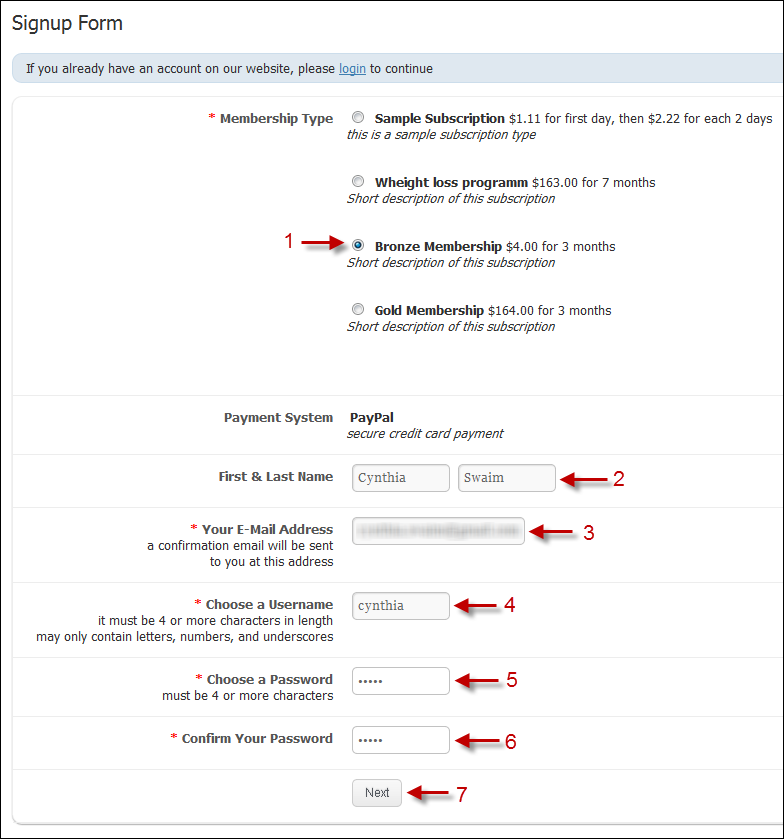
This is the aMember Signup Page. By default, it lists all products and allows the user to pick one. This page is highly configurable to accommodate virtually any way you want to present products for sale. You can even have an unlimited number of product pages, each with their own unique URL.
The user would fill out the form as follows:
- In this case, the user chose the "Bronze Membership".
- User enters their first and last name.
- User enters their email address. Note that most aMember installations are set up to require that each user have a unique email. aMember can also be configured to send email verification to the user.
- User enters their preferred username. Note that many requirements of the user's username can be configured in aMember.
- User enters their preferred password. Note that many requirements of the user's password can be configured in aMember.
- User re-enters their preferred password to check for accuracy.
- User clicks on the "Save" button to submit the signup form.
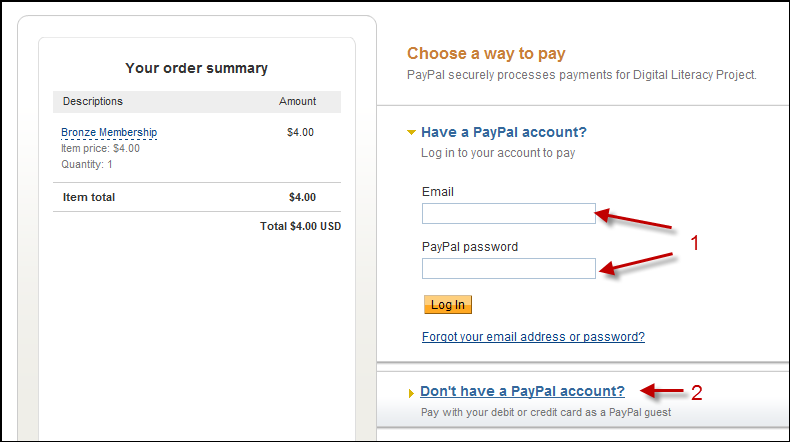
The user is then taken to the PayPal site to complete the transaction. Note that some customization of this PayPal page is possible to keep some of the look/feel of the original site.
- Users with a PayPal account simply log in.
- Users without a PayPal account can complete the transaction as a "Guest".
When the transaction is completed on the PayPal site, the user will be redirected back to the original site and is presented with the following "Thank You" page.
