Video
Video Protection Overview
The aMember program includes Plyr player which is used for audio and video playback. The current aMember video protection feature is serves video files uploaded to the site's server or to Amazon S3 storage.
Configure Plyr
To set up the default settings for the video player follow these steps:
- From the aMember admin control panel, click on Setup/Configuration from the left menu panel.
- Click on video in the top menu panel
- Configure the following settings. If you are not sure what the
settings should be, start with the defaults and test the results.
Also note that you can change these settings on a per video basis in
the Protect Content settings.
- Default Width/Default Height - This will be the size of your video in pixels. For the best results the player dimensions should match the size of the video. Most professional videos are published to the 4:3 or the 16:9 aspect ratios. The more popular 4:3 sizes are 640x480, 800x600, and 1024x768. The more popular 16:9 sizes are 640x360, 800x450, and 1280x720 (the size for YouTube "HD").
- Auto Play - Whether the player should start playback immediately upon loading
- Be sure and click on "Save" to record these values.
Upload and Protect Video
To upload a video file to the site's server and add protection to it follow these steps:
Click on the "Products" bar in the left menu
Click on the "Product Content" menu button
Click on the "Video" button in the top menu bar
Click on the "New Record" button as show in the image below

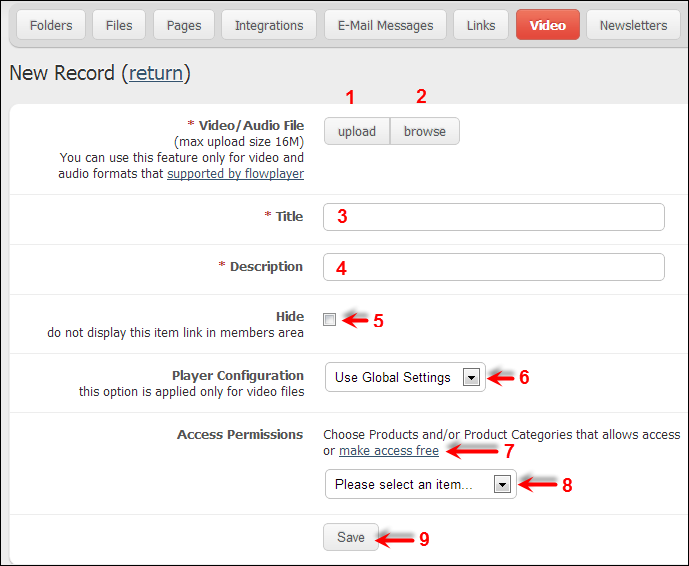
A form like the one shown below will then open up.
To add a file with protection follow these steps:
Video File - Upload a video file from your local computer by using the file upload feature -or-
Video File - Browse to the video file that already exists on the aMember server or other web storage services (such as Amazon S3) using the file browser feature. When you click on this button a file browser window will pop-up. See details on this feature after this section..
Title - Add a title/name to the video.
Description - Enter a short description of the video here.
Hide - By default, links to protected video's are listed in the Member's Area. If you do not want the link shown in the Member's area, check this box.
Player Configuration - Click on this drop down menu to set custom settings for the video player. You can also save the custom settings and use them on other videos.
Access Permissions - "Make access free" - When you click on this link you are offered two choices:
- Make this item protected - This choice would make the video available to anyone that was logged in.
- Make this item available without login and registration - This choice would make the video available to anybody, event those not logged in.
Access Permissions - "Please select an item..." - Use this drop down menu to assign a membership product or category to the video. See addition details in the next section.
Save - Always finish by clicking on the "Save" button.

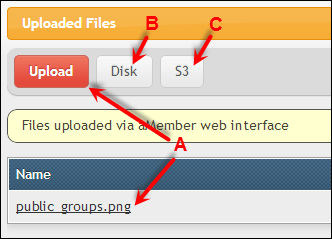
File Browser Popup If you click on "Browse" (#2 in the above illustration) the following file browser window will pop up. You have the following three choices:
- Upload (A) - Use this button to choose a file that was previously uploaded by the aMember upload button (#1 on the main file page). All files previously uploaded are listed on this page. So click on "Upload" then click on the file name from the list to choose a previously uploaded file.
- Disk (B) - Use this option to pick a file that was previously uploaded into the http://example.com/amember/data/upload directory via FTP or any other file transfer process.
- S3 (C) - If you have enabled the Amazon S3 plugin, this button will be available. This allows you to securely serve a file from a file stored in a S3 bucket.

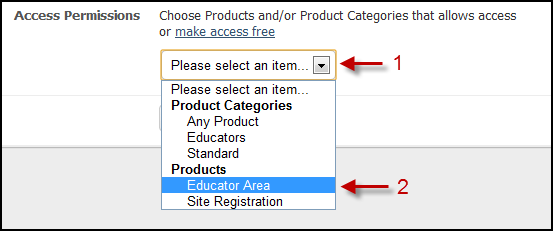
After clicking on the "Please select an item..." (Step 8 from above) drop down menu, the menu will open up to display all previously defined membership products and categories.
Choose from the listed products or categories. After you make a choice, you can reopen the drop down menu and make additional choices.

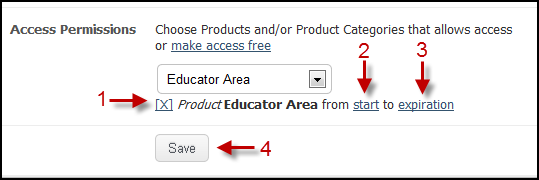
After a product, or category is picked, it will be displayed as shown in the image below.
- You can delete a membership product, or category, by clicking on the "X".
- By default, access to the video will start as defined in the Product setup configuration.
- By default, access to the video will expire as defined in the Product setup configuration.
- Always click on "Save" after making any changes on this page.
Note that the "start" and "expiration" days can be configured to provide
video access in an incremental fashion. For more information on setting
up incremental content delivery, see this page.

Retrieving Video Links and Embed Code
After the video configuration page is saved. The video will be shown on the Video List Page as shown in the image below.
Click to Expand - Click on this link to access JavaScript code that can be used to embed the video into a webpage.
Link - This is the link to use for the protected video. Hover over the link and click the right mouse button. From the contextual menu choose "Copy link address". If you use this link, the video will play on the aMember page.
Edit - Click on this icon to edit the settings for the protected video.
Delete - Click on this icon to delete the video from the protected area.

To use the embed code, follow these steps:
Click on the JavaScript Code link.
A box will open up and provide embed code for the video.
The width can be defined here.
The height can be defined here. Note that you do not need to define height since the player will establish the height based on the width and the video's aspect ratio.
Highlight all the text, right click the mouse and copy all the code to your computer's clipboard.
Pate the embed code into a webpage.
