Introduction
The Email Setup/Configuration page is where you can configure the Email addresses and Email sending format. Remember to click the "Save" button at the bottom of the page once you have made your changes to the configuration.
Accessing Email Configuration Options
- Go to the Configuration page by following the instructions on Setup/Global.
- Click on the "E-Mail" button.

The "Setup/Configuration: Email" page will be displayed. You can setup/edit the email configuration for your site from this page.
Email Address Configuration
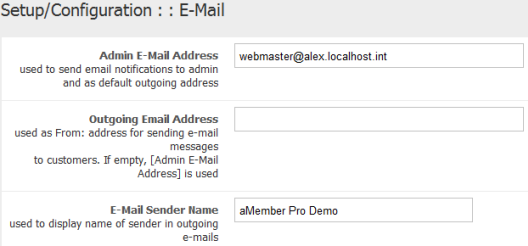
In this section, you will be able to set up the outgoing email configuration for your site. The email addresses you send here and the name you enter in this section will be used for all outgoing emails sent from your site
- Admin E-Mail Address- In this field, enter the email address to send and recieve notifications to/from. The email address specified here will be used to send email notifications to admin and will be used as default address for outgoing emails.
- Outgoing Email Address- In this field, you can optionally enter an email address to send outgoing emails from. If this field is left blank, all outgoing emails will be sent from the Admin email address.
- E-Mail Sender Name- Type in the name that will be used as the sender name in outgoing e-mails.
Email System Configuration
The E-mail System Configuration is where you can set up email sending methods, test email addresses, and specify the number of days for email log.
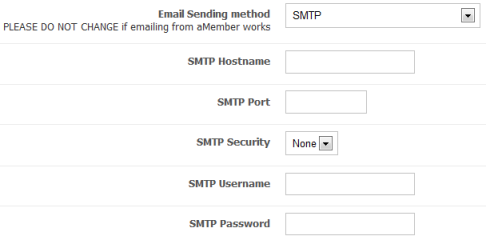
Email Sending method - By default, the system uses the aMember Internal PHP mail to send and recieve mail for the site. You have the option of changing this to SMTP mail if needed.
SMTP Mail Settings
If SMTP is selected as the email sending method, the SMTP fieldnames will be displayed where you will have to specify SMTP settings.
SMTP Hostnameenter your SMTP server name.SMTP Portenter the port that will be used to send and receive email, that is usually25SMTP Securityclick on the arrow button and select the type of security to be used.SMTP Usernameenter your username for the specified SMTP account.SMTP Passwordenter the password for the specified SMTP account.
Test Email Settings
In this section you can specify an email address to sent test emails to and also send a test email to see if the email settings that you have set up work.
- Enter the email address to send the test email to in the "E-Mail Address to Send to" field.
- Click the "Send Test Email button" to send the test email.
Check your email to see if you received the test message. If your settings were specified correctly, then you will receive the test email. Otherwise you might have to back to the email configuration page and check if your settings were correctly entered.

Outgoing Messages Log
aMember's outgoing messages log stores a list of all outgoing emails. In the "Log Outgoing E-Mail Messages for ... days" field you can specify the number of days for storing outgoing messages in the log. For example, if you enter 7 here, only the email messages sent during the last 7 days will be stored in the outgoing messages log.

Using the Email Throttle Queue
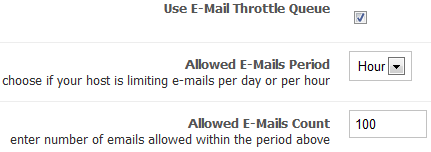
Some email providers limit the number of messages you can send/receive in a day. If your email provider limits messages you can user the Email Throttle Queue to set up how many emails are allowed per selected frequency. This way, the system will not attempt to send more the specified amount of emails within the time period. It will automatically send the other emails once the limiting period has passed.
- To use the email throttle queue, select the "Use E-Mail Throttle Queue" checkbox. Once the checbox is enabled, the other fields for the email throttle queue are displayed.
- In the "Allowed E-Mails Period" field, select whether your provider is limiting emails per hour or per day.
- In the "Allowed E-Mails Count" field, enter the number of emails allowed per limiting period.
Validation Message Configuration
In the Validation messages to customer section, you can select/change the templates for the validation messages sent to customers. aMember provides a variety of templates that you can user to send validation messages. You can select the one you want to use for these validation messages.
- ' Verify E-Mail Address On Signup Page' - This template stores the email message sent to the customer to verify the email address provided on the signup page. To change the template for this message, click on the "Edit Email Template" link and select the template of your choice.
- Verify New E-Mail Address On Profile Page- This template stores the email message sent to the customer when they change their email address on the Profile page. To change the template for this message, click on the "Edit Email Template" link and select the template of your choice.

Email Messages Configuration
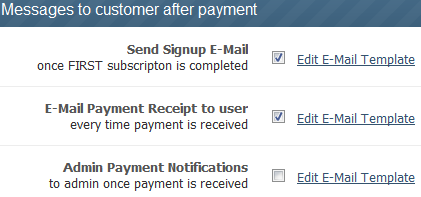
The Messages to customer after payment allows you to select the emails that you would like to send to a customer once the customer makes a payment. You can also select/edit the templates used for these messages.
- Select the "Send Signup E-Mail" checkbox to send an email once the customer signs up and makes the first payment. Leave the checkbox unselected if you do not want the customer to receive an email once they signup. You can change the template used for this email by clicking on the "Edit E-mail Template" link and selecting a new template.
- Select the "E-Mail Payment Receipt to user" checkbox to send a payment received email every time a customer makes a payment. Leave the checkbox unselected if you do not want the customer to receive the payment received email. You can change the template used for this email by clicking on the "Edit E-mail Template" link and selecting a new template.
- Select the "Admin Payment Notifications" checkbox to send a payment received notification to the admin every time a customer makes a payment. Leave the checkbox unselected if you do not want the admin to receive the payment received email. You can change the template used for this email by clicking on the "Edit E-mail Template" link and selecting a new template.
Forgotten Password Templates
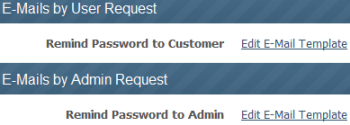
The E-Mails by User Request section allows you to edit the template for the email that is sent to a customer when a customer requests a forgotten password. To change the template, click on the Edit E-mail Template link and select a new template.
The E-Mails by Admin Request section allows you to edit the template for the email that is sent to the admin when an admin requests a forgotten password. To change the template, click on the Edit E-mail Template link and select a new template.
Miscellaneous Email Settings
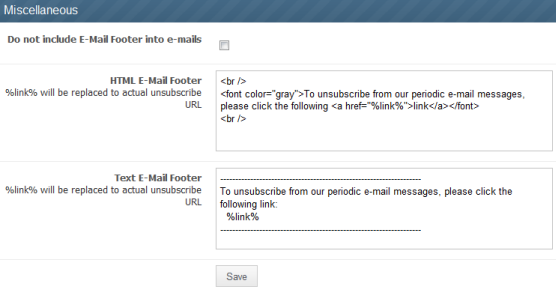
The Miscellaneous section allows you to select whether you want to include a footer in emails. It also allows you customize headers according to your preferences.
- Select the "Do not include E-Mail Footer into e-mails" check if you do not want to have a footer in your email. By default all emails will be sent with a footer. When you select this checkbox, they will be sent without the footer.
- In the "HTML E-Mail Footer field", you can specify the HTML code for the footer if you would like to use a HTML footer in your emails.
- In the "HTML Text Footer field", you can specify the text for the footer if you would like to use a text footer in your emails.
Remember to click on the "Save" button to save any changes that you made on this page.