Using Coupons
Introduction
The Coupons section of aMember enables you to set up coupons for promotions that you can offer to your customer. You can create a coupon and specify the % of discount, the dates on which the coupon will be valid and the number of times that the coupon can be used using the functions available in this section.
In case you want customer can use coupon code you need to add Coupon Brick to your signup form. You can do it at aMember CP -> Configuration -> Forms Editor -> (Edit).
Creating a New Coupon
To create a new coupon:
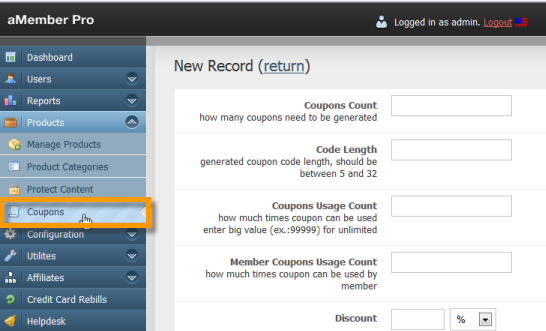
- Login to the Admin Console and select "Products" from the
options available on the left side of the screen. Then select
"Coupons" from the options available under "Products".
- Click on the "New Record" button on the Coupons screen.
- The New Coupon page is displayed where you can enter the details of the coupon that you are creating.
Adding Coupon Information
- In the "Coupons Count" field, enter the number of coupons you would like to generate.
- In the "Code Length" field, enter the how many characters long the generated coupon code should be. You can choose any length between should be between 5 and 32 characters.
- In the "Coupons Usage Count" field, enter how many times the coupon code can be used. This field is useful when you want to limit the use of the coupon to the first 100 customers or a certain number. To make the coupon use available to an unlimited number of customers, enter a big number like 999999.
- In the "Member Coupons Usage Count" field, enter the number of times a member can use a coupon. If a member can use the coupon any number of times, leave this field blank.
- In the "Discount" field, enter the percentage or the amount of discount to be offered via the coupon. When a member uses the coupon, this is the percentage or amount of discount that they will get. Enter value between 1 and 100. The default selected value is percentage, to select amount click on the drop-down field, and select "USD".
- In the "Comment" field, enter any comments or notes about the coupon. The contents of this field will be visible only to the admin.
- In the ' "Dates"' field, select a date range when the coupon can be used. Click on the calendar icon in the fields and select the start and end dates.
- In the "Apply to recurring?" field, select the checkbox to apply coupon discount to recurring rebills.
- In the "Is Disabled?" field, select the checkbox to disable the coupon. If you disable this coupons batch, it will not be available for new purchases. Existing invoices are not affected. This field can be used when you are editing coupons or are just setting up coupons and do not want to use them yet.
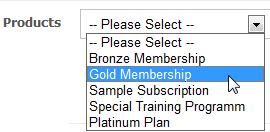
- In the "Products" field, click on the arrow button and select
the product(s) the coupon can be applied to from the drop-down list
of available products. Coupons can be used with selected products.
Hold "Ctrl" Key to select multiple products. If nothing selected,
coupon can be used with ANY product.
- Click on the "Save" button to save changes.
Edit Coupon, Delete Coupon, Retrieve/Export Coupon Codes
After creating a coupon, the coupon will be listed on the coupon homepage. In the Actions section there are four icons that perform the following tasks:
- Edit: This allows you to edit the coupon variables
- Delete: This allows you to delete the coupon.
- View Coupons: This will list all the coupons and also allows each coupon to be manually renamed.
- Export: This allow you to export all the generated coupons as a .CSV file
![]()

